Building your own birdhouse is a rewarding and fun DIY project that not only brings charm to your garden but also provides a safe shelter for local birds. Whether you are an experienced woodworker or a complete beginner this guide will walk you through the process of making a birdhouse using basic tools affordable materials and simple techniques. Best of all it is beginner friendly and environmentally friendly.
Why Build a Birdhouse?
Birdhouses offer birds a safe place to nest away from predators and harsh weather. They also encourage biodiversity in your backyard and help support local ecosystems. Plus building a birdhouse is a fantastic hands on activity that can be enjoyed by individuals or families alike.
Tools and Materials You’ll Need
Before you start gather the following basic tools and materials:
Tools:
- Hand saw or power saw
- Hammer
- Screwdriver or drill with screwdriver bits
- Measuring tape or ruler
- Pencil
- Sandpaper medium grit
- Clamps optional but helpful
Materials:
- Untreated wood pine or cedar recommended approximately 1 thick
- Nails or screws 1 to 1.5 inches long
- Wood glue optional
- Hinges optional for cleanout door
- Non toxic outdoor wood paint or wood sealer optional
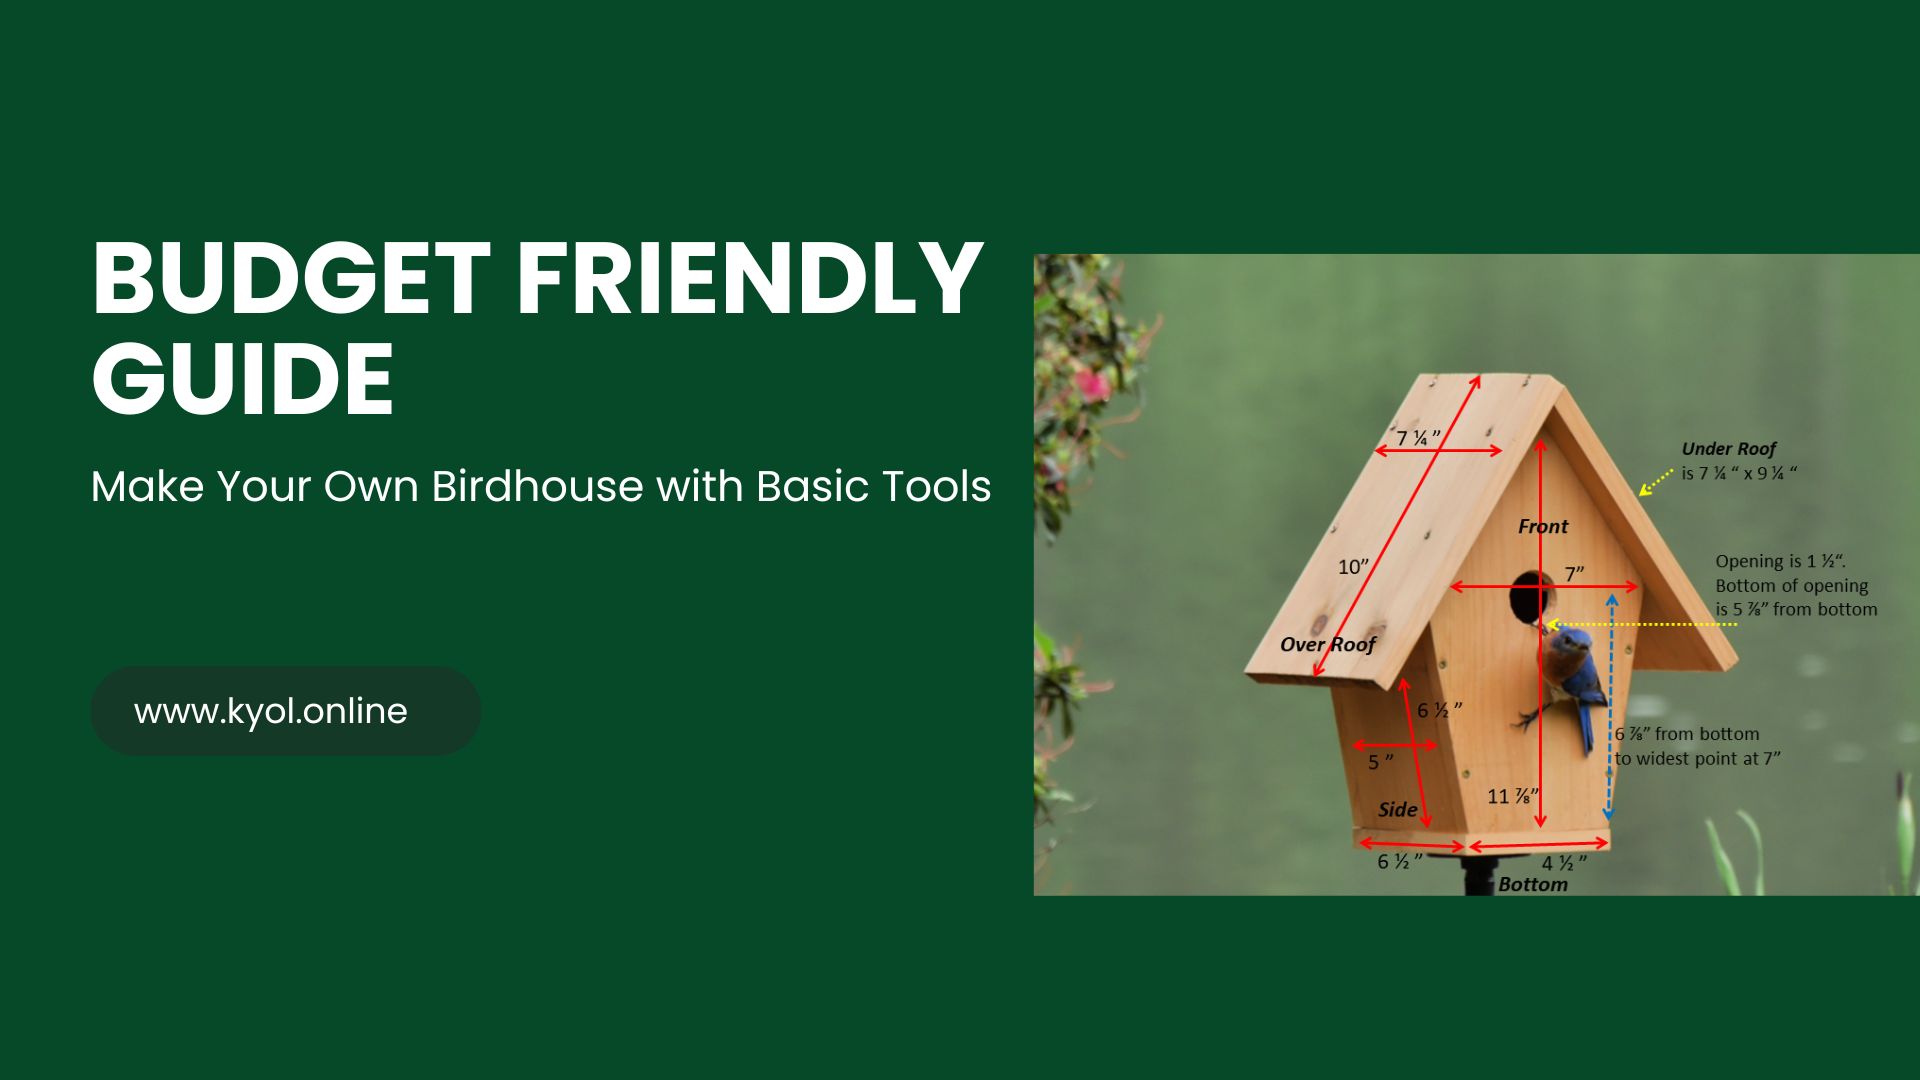
Step 1: Design Your Birdhouse
Start by deciding the size of your birdhouse based on the bird species you want to attract. A simple classic birdhouse typically has:
- Floor size: 4 x 4
- Height: About 8 to 10
- Entrance hole diameter: 1.25 to 1.5 perfect for small songbirds
- Roof: Sloped to shed rain
Keep the design simple a rectangular box with a sloped roof and an entrance hole is ideal for beginners.
Step 2: Cut the Wood Pieces
Measure and mark your wood pieces according to the design:
- Front panel with entrance hole
- Back panel solid
- Two side panels
- Floor panel
- Roof panels two pieces for a sloped roof
Use your saw to cut these pieces carefully along your measurements. Sand all edges smooth to prevent splinters and make the birdhouse safe for birds.
Step 3: Drill the Entrance Hole
On the front panel measure about 6 from the bottom and mark the center point for the entrance hole. Use a drill with an appropriate sized hole saw bit or a spade bit to cut out the entrance. Make sure the hole is smooth inside sand if needed.
Step 4: Assemble the Birdhouse
Start by attaching the sides to the back panel using nails or screws. Then fix the floor panel at the bottom. Attach the front panel with the entrance hole last ensuring it fits snugly.
If you want easy access to clean the birdhouse each season consider attaching the roof or one side panel with hinges.
Use wood glue along the edges before screwing or nailing for extra sturdiness.
Step 5: Add the Roof
Attach the roof panels to create a sloped roof that overhangs slightly to keep rain out. Make sure the roof is securely fastened.
Step 6: Finishing Touches
Sand any rough edges and clean up your birdhouse. If desired apply a coat of non toxic outdoor wood paint or wood sealer to protect the wood from weather damage. Avoid painting the inside or the entrance hole area to keep the environment safe for birds.
Tips for Placing Your Birdhouse
- Mount your birdhouse 5 to 10 feet off the ground in a sheltered spot.
- Avoid placing it in direct sunlight or where predators like cats can reach easily.
- Face the entrance away from prevailing winds for extra protection.
Benefits of DIY Birdhouses
- Saves money compared to store bought versions
- Customizable to attract specific bird species
- Eco friendly by using untreated natural materials
- Fun project that encourages outdoor activity and wildlife observation
Common Mistakes to Avoid
- Using treated or painted wood inside the house harmful to birds
- Making the entrance hole too large invites predators
- Neglecting drainage holes make sure the floor has small holes to let rainwater escape
Frequently Asked Questions FAQs
Q1: What type of wood is best for making a birdhouse?
A: Untreated wood like pine cedar or redwood is ideal. Avoid treated or pressure treated wood as chemicals can harm birds.
Q2: How big should the entrance hole be?
A: The size depends on the bird species you want to attract. For small songbirds a hole about 1.25 to 1.5 inches in diameter works well.
Q3: Can I paint the birdhouse?
A: Yes but use only non toxic water based outdoor paints or sealers. Avoid painting the inside or the entrance hole area to keep it safe for birds.
Q4: Where should I place my birdhouse?
A: Mount it 5 to 10 feet above ground in a sheltered area away from direct sunlight and predators. Facing the entrance away from prevailing winds helps protect the nest.
Q5: How do I clean my birdhouse?
A: Clean your birdhouse at the end of each nesting season by opening the roof or side panel if hinged and removing old nesting material. Wear gloves and use mild soap and water if needed.
Conclusion
Building your own birdhouse with basic tools is a fulfilling and practical DIY project that invites nature right to your doorstep. Not only does it provide a safe haven for local birds but it also adds charm and life to your garden. By following this step by step guide even beginners can confidently create a durable bird friendly home using affordable materials and simple tools.