Are you working in a small garage, apartment or shed and need a reliable workspace that does not eat up all your room? A foldable workbench might be exactly what you are looking for.
In this step by step guide we will walk you through how to make a foldable workbench that is durable, affordable and easy to build even if you are new to DIY projects. Whether you are a weekend woodworker a crafting enthusiast or just someone who wants a functional space that tucks away when not in use this guide is for you.
Why Choose a Foldable Workbench?
Before diving into the build lets quickly cover why a foldable workbench is a smart solution:
- Saves space: Perfect for garages, apartments or tight work areas.
- Portable: Easy to move and store.
- Multi purpose: Use it for woodworking, repairs, crafts or even as a portable desk.
- Budget friendly: You can build one for under $100 with basic tools.
What You will Need (Tools & Materials)
Most of these items are available at your local hardware store or online.
Materials:
- 1 piece of ¾” plywood (for the workbench top 2×4 feet is ideal)
- 2×4 lumber (for the frame and legs)
- Folding shelf brackets (also called drop leaf or heavy duty folding brackets)
- Wood screws (1 ¼” and 2 ½”)
- Wood glue (optional but recommended)
- Sandpaper or sanding block
- Wood stain or paint (optional for finishing)
Tools:
- Power drill with bits
- Saw (circular, jigsaw or hand saw)
- Measuring tape
- Pencil
- Level
- Screwdriver
- Safety gear (gloves, goggles)
Step by Step Build Your Foldable Workbench
Step 1: Measure Your Space
First choose where your workbench will be mounted usually on a garage wall, basement wall or even a shed.
Measure the space and decide on the bench height. Standard workbench height is around 34 to 36 inches. Adjust to what feels comfortable for you.
Step 2: Cut the Wood
Use your saw to cut the following:
- Workbench top: Cut your plywood to your desired size (e.g., 24″ x 48″)
- Frame pieces: Cut four 2x4s to form a rectangle under the plywood for support
- Legs (optional): If you want extra support, cut two legs around 30 to 34 each (depending on your final bench height)
Tip: Always double check your measurements before cutting. Measure twice cut once!
Step 3: Build the Frame
Lay out the 2×4 pieces in a rectangle matching the size of your plywood top.
- Attach the frame together using 2 ½” screws and a bit of wood glue for extra strength.
- Place the plywood on top of the frame and screw it down using 1 ¼” screws.
Now you have got a solid tabletop and frame lets make it fold!
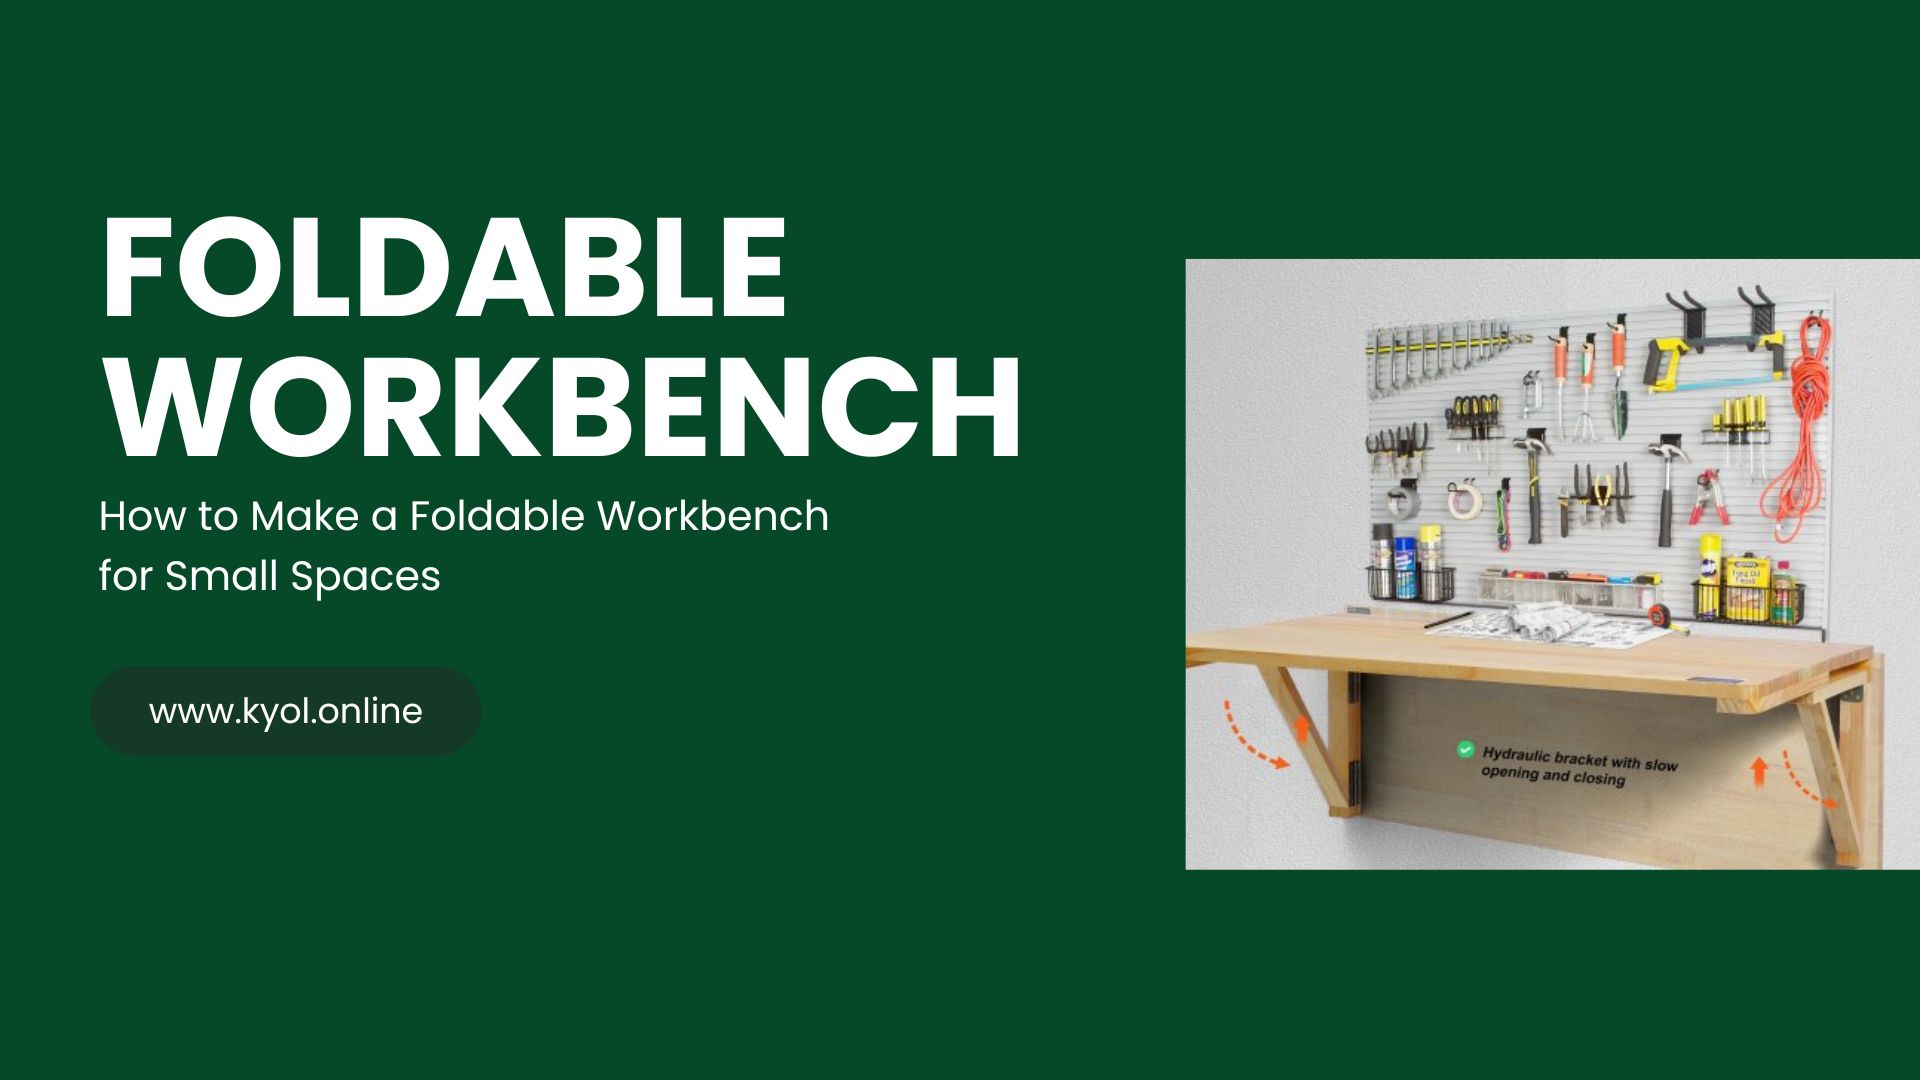
Step 4: Attach Folding Brackets
Folding brackets are the key feature that make your workbench foldable. Here is how to install them:
- Mount the brackets to the wall at your desired height.
- Attach the underside of the frame (your bench) to the brackets.
- Test to make sure it folds up and down smoothly.
Pro Tip: Use a level to make sure the brackets are mounted evenly. A crooked mount means a wobbly workbench.
Step 5: Add Support Legs (Optional)
If your folding brackets do not support much weight (check the manufacturers specs) consider adding folding legs for extra stability.
You can either:
- Use hinged legs that fold inward under the bench
- Or install removable legs that you pop on when using the bench
Secure them well and test for balance.
Step 6: Sand and Finish
- Use sandpaper to smooth rough edges and corners.
- Apply wood stain, paint or a clear sealant if you want a finished look.
- Let it dry for at least 24 hours before using.
Safety Tips
- Always wear safety glasses and gloves when cutting or drilling.
- Make sure your wall can support the bench (especially if you are installing on drywall).
- Do not overload the bench check weight limits of your brackets and frame.
Customization Ideas
Once you have built the basic bench, you can customize it for your specific needs:
- Add pegboard above the bench for tool storage.
- Install hooks or magnetic strips for tools.
- Mount LED strip lights for a better lit workspace.
- Use casters on the legs for mobility (if not wall mounted).
Maintenance & Storage
One of the best features of a foldable workbench is how easy it is to maintain:
- Wipe it down regularly to remove dust and sawdust.
- Fold it up after use to protect it and free up space.
- Occasionally check screws and brackets to ensure everything is still tight.
FAQs About Foldable Workbenches
Can I build this without power tools?
Yes but it will take longer. A handsaw and manual screwdriver will work though a drill and circular saw make it much easier.
Whats the weight capacity?
Depends on the brackets and hinge strength. With quality materials and solid mounting it can hold 100 to 200 lbs easily.
Can I make it larger?
Absolutely! Just make sure to use extra supports if you increase the width or depth.
Conclusion
Building a folding workbench is one of the smartest and most cost efficient DIY projects you can take on especially if you are working with a tight space like a garage, apartment or shed. With just a few tools and basic supplies you can build a sturdy practical workspace that folds away neatly when not in use.
Whether you are new to DIY or just looking for a weekend project this guide gives you everything you need to get started. From saving space to customizing your design the possibilities are endless and the satisfaction of creating something from scratch is hard to beat.